Quick Slants runs four routes designed to get your playmakers from the outside into a cleared out middle of the field. Although there are four routes, the play should almost never throw to the FB or TE going to the flats. The play diagram in the game shows the strong side slant route run by the flanker as the primary route, but in reality both the split end and flanker slant routes are equally "primary." The QB has to read the coverage and release at the line to choose which slant to throw, especially when the defense is in bump and run coverage to mess up the timing.
If we are never going to throw to the flat, why is it so important that we have those in the route package? The reason is that the TE and FB are being used to clear out the middle portion of the underneath zones for the wide receivers to run into. In man coverage, a linebacker or safety will take the TE and a linebacker will mark the FB - both of those players will run with their assignments to the outside and vacate the center of the field. In zone coverage, the TE and FB running into the flats forces the defenders assigned the flat zones to commit to them, bringing them forward and away from where the slant routes are being run.
Against Man Coverage
In the picture below, we want the defenders in the yellow boxes to clear out the seam areas along the hashmarks for our slant routes to run into. The MLB in the center will most likely either sit in a middle zone or blitz; either way, he is not going to be close enough to break up the two primary slant routes.
The two flat routes each peel off one defender - NC State is in man coverage with OLB on the FB and TE. The SS and MLB playing the center of the field, with an alignment closer to the short side slant route. The SS is in a good position to make a play if we try to throw to the flanker on the right side. Instead, we look to the left where the MLB is too far away to provide inside help to the CB.
What you should see in the next step of the play is that the split end wide receiver on the left side will break to the inside behind the OLB and in front of the loose corner. The FS remains high, providing over the top help against a deep pass. But because the FS is near the hashmarks, the CB stays outside since his deep help is on the inside.
The above screenshot is taken just before the ball is thrown. The SS drifts back to take away the right slant. Over on the left side, the split end makes his break and is headed to open space - that's where we throw. Note the WR makes the catch right near the hashmarks.
Against Zone Coverage
Here is a second example showing Northern Illinois in a 4-3 Eagle defense. We want to pull those two outside linebackers away from the hashmark lines, and draw them outside with the flat routes.
After the snap, look at the outside linebackers. The weak side OLB is backing away instead of moving up toward the HB. On the strong side, the OLB is simply not moving, indicating he is settling into an underneath pass coverage zone. So we know we are facing what looks like standard Cover 2 with no blitz.
The reason the SOLB does not need to move much is because he is on the short side of the field. What's happening off camera is the cornerbacks are giving some initial challenge at the line, but will release to cover the flat zones - that's why the OLBs don't need to move up.
Normally in man coverage, the cornerback would stay with his wideout and the linebacker would come up to fill the flat. But this is a pure zone scheme; the wide receivers instead are allowed to run free and we have to time the throw to arrive as the receiver hits the seam between two zones so neither defender is near him. On the break to the inside, the wide receiver will run straight through the OLB's zone - when do we throw the ball?
The next picture shows the throw - you can see the quarterback start his throwing motion. Notice where the receiver is: he is about to pass right in front of the OLB. The throw is being made in anticipation of the receiver running away from that defender into the hold in the coverage. This is why throwing against zone changes the Quick Slants play from a read on which receiver has an inside release to a read on when the receivers will hit the seams between zones.
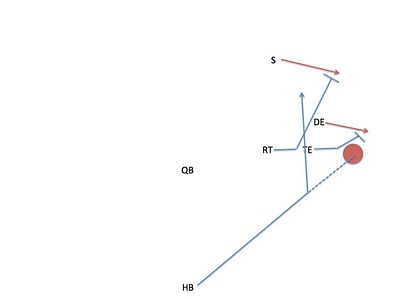
The purple dashed line shows a clear passing lane to a spot relatively equidistant from the three zone defenders. Our threats to the outside spreads the defense allowing for open looks to the middle.
Does the defense really have to respect the flat routes?
Of course, the defense could choose not to respect the flats and hold some defenders in the middle to take away the slants. We do not want to throw to the flats, but you must be prepared to recognize when that is what the defense is giving you. If both slants are covered, it means one of the flats is probably open - and you must punish the defense for gambling like that.
Here is another game against NC State in which we find our slant routes taken away by man coverage to the inside. The left flat is covered as well. But look at the defender on the edge of the right side.
That edge defender is heading toward the flat with our HB at first, but then abruptly decides he has a clear line to the quarterback and goes for the sack.
He has no help behind him to cover the HB spilling out into the right flat zone, so we make him pay.
Here is another play from the same game. This time, the defense blitzes a linebacker (you can see him shooting the gap) and has nobody assigned to the flat.
Does the defense need to honor the flat routes? The short answer is: Yes.
EVERY FOOTBALL TEAM has a basic philosophy it can "hang its hat on." At Columbia, whenever our offense gets bogged down and begins to struggle, we can always turn to our quick passing game to get back on track.
Its key ingredients are base zone-side protection, a quick 3-step drop by our QB, and precise timing routes by our receivers. Specifically, however, it's the slant route that provides the basic frame for our entire 3-step package.
Regardless of the secondary coverages, some combination of the slant route will enable us to attack the defense.
We're not going to say it's easy to execute. For precise timing and execution, the slant requires more practice time than any other individual route.
This is the most important pass play that keys the entire passing portion of the offensive package I am presenting. It is the one pass play ought to be able to go back to for medium yardage time after time. Here is an article intro from Bleacher Report:
The slant route is perhaps the oldest route in all of football. It has always been an integral part of the short passing game from Sid Gilman to Don Coryell to Bill Walsh, and now to all of today's offensive geniuses; and among them Sean Payton is high on the list.
Payton has used the slant in many key situations over the past few seasons. In fact, it's been a go-to route on third-and-short or medium situations.
It will be our go-to route as well. It is a versatile play that can attack both zone and man coverage schemes effectively, and is fairly effective against the blitz. What is important is the last part of the excerpt from Coach Mizer: "For precise timing and execution, the slant requires more practice time than any other individual route."
Successful use of Quick Slants against any defense requires you as a player to do three things:
Recognize the cornerback coverage - is it press or loose? This tells you something about how long you will probably have to wait until either WR can get open because press coverage typically means bump and run at the line.
Recognize the WR releases on both side - did your WRs get inside or outside releases? This is crucial because a WR running a slant route is supposed to use his body to block out the defender. When the WR gets an inside release, there is no defender between him and the ball. When he gets an outside release, the DB is between him and the ball - even if his back is to the QB, it is still a problem.
Recognize the LB and Safety help - are they close enough to where the WR will be when the slant is thrown? Especially in Cover 2 or other zone looks, there will be defenders sitting in space waiting for the receiver to run into the spot they are taking away. That affects the timing of the throw because now you don't just need to worry about throwing the ball when the WR gets separation from the man on him; now you need to worry about what's in front of that WR.
Spacing for the Release: Press versus Loose CB Play
The most desirable coverage you want for your WR is loose coverage - the looser the better. Quick Slants is trying to take a 3 step drop and fire immediately, with the route timed to fire for separation right when the QB makes the throw. If there is no bump at the line of scrimmage and the WR gets to run his route free of any defender pushing him off stride, you can hit the slant route in stride for big yardage. The longer a defender can push the receiver around at the line or break the timing, the higher the chance a blitz can get to the QB before the play develops (even if this is a super fast developing play).
Let's look at what CB alignments you can see in the game. First, we have very loose coverage with the CB sitting 6 yards off the left wide receiver. This allows for lots of space and is typically used when the defender wants to avoid being beaten deep but will give up a short route. The receiver is not in the frame, but you can see his shadow on the ground.
The next shot shows the left wide receiver with about 4 yards of space from the cornerback in front of him:
And finally, we have press coverage with the CB lined up in the face of the receiver:
The reason this matters is because the likelihood of a cornerback putting his hands on the receiver to prevent him from getting into his route is much higher when the CB is standing right in front of the receiver he wants to grab. Especially with the Quick Slants route package where the outside wide receivers break into slant routes shortly after the ball is snapped, the chance a CB playing loose coverage will even be able to grab the receiver even if he wants to is low.
Now, don't take this to mean that every time you see press coverage you will always see bump and run at the line of scrimmage. There are in fact zone schemes where the CB may make a token bump at the line but for the most part will let the WR run while the CB sits on the flat zone. That kind of coverage or even a corner blitz will count on defenders behind the cornerback to pick up the WR. Take this shot of ND playing this kind of defense, where the CB sits on the flat and you see the linebackers and safeties dropping back into coverage:
Notice the WR got a free release with no bump whatsoever at the line in spite of facing press coverage. This brings us to our next point.
The Release: Inside, Outside, or Free?
The only reason we really care about the spacing in press and loose coverage is because it gives us an idea of what kind of release we will get from that receiver-defensive back matchup. The release is the big deal because the release is what dictates whether the WR will be a viable target. Here is Will Osgood talking Black and Gold X's and O's: Identifying Concepts: The Slant Route:
Assuming the play is designed so that the "slant read" is primary, the Quarterback must look at a few things pre-snap to see if the slant can be thrown.
First, he must know what kind of look he is getting from the corner or other defender. Many quarterbacks don't feel comfortable (and receivers for that matter) throwing the slant if the defender starts the play inside of the receiver.
For Drew Brees, he will still throw it as long as he knows Colston, Moore, Henderson, or Meachem are going to get that original defender to the outside of him.
Again, the best outcome is to get a nice free release with no bump at the line. Let's continue the play above with Notre Dame giving our guy a free release at the line. Watch as he makes his foot plant and explodes to the inside, splitting the coverage:
At this point in the play, there is a linebacker between the QB and the receiver. To throw directly at the receiver now would be awful. However, look at the flow of the action - the CB is guarding the flat against the HB while the OLB and FS are both moving toward the outside of the field. When the WR plants his foot and makes his cut, he is going against the grain in the opposite direction of those two defenders.
This is what we want to see: our WR is now streaking across the middle in front of the safety. The linebacker is no longer a threat to intercept or break up the pass, and we have a clear throwing lane to where the receiver will end up. This is where the QB needs to start his throwing motion because he wants to throw along the dashed yellow path to where the receiver will end up if he continues running his route along the red arrow path.
The result is an easy touchdown thanks to the fact that we had nothing stopping the route from developing. The free release was what made this a very easy throw. Note the other receiver entering the picture on the right is also open in front of the strong safety.
So what does it look like when we have bump and run coverage? What would an inside and and outside release look like? Here are the two WR on a single Quick Slants play immediately after the snap. The left wideout has an inside release. You can tell immediately at a glance because you see the red jersey color rather than the white jersey color of the defender. The CB is on the outside looking in, and will not be able to stop our guy from breaking to the inside to run away from the defender. This is Colston, Moore, Henderson, or Meachem getting their guy to the outside off the line.
Our right wideout lost the battle at the line of scrimmage and has been forced to take an outside release. You can see this immediately by the fact that the defender's back is turned toward us - he is pushing the WR to the sideline.
Which guy is more likely to be open when we want to throw the ball? It's always the guy with the inside release, so we look to the left side for an open throw and it is there.
Here's another look at a case where we have an inside release on one side and an outside release on the other side. Quick Slants against Wake Forest near the end zone, we see our left wideout has an outside release. The fact that the Wake defender is positioned closer to where our receiver wants to break to means we are less likely to have an open, high percentage throw.
This means we want to look at the other side for an inside release, where our guy will be closer to where he wants to break to:
That's a winner. How open is he going to get? Look at the safety moving toward the middle of the field - our WR is running into the area that safety is vacating.
Quick Slants vs. Loose Man
Against loose man coverage, you get a free release and a quick, easy throw in front of the soft corner. Here we have a soft corner on the right WR:
The cornerback is playing several yards off the receiver, and at the snap goes into a backpedal to play the deep routes. As with the sequence shown above when the Notre Dame CB played the flat and let our WR blow past him at the line, we have a free release situation where the WR will plant and explode to the inside with nobody slowing him down. The wideout has a clear path between the underneath defenders and the CB dropping into the deep zone. Notice how similar this looks to the earlier shot of the left WR cutting in front of the Notre Dame safety:
This is where we start the throw - before the WR has cleared the defenders in anticipation of him getting open into the area where the referee is. If we take this further back zoomed out, you can really see how similar it looks to the earlier setup:
So why is the right WR and not the left WR the correct throw? Look at the safety playing centerfield. He is standing in the red and white part of the endzone where the goalpost is. That's a lot closer to the left WR than it is to the right WR - we want to throw away from the help.
Quick Slants vs. Tight Man
That is your ideal situation, though, getting a clean release off the line. In most situations, the defense will challenge your receivers to break up the timing of the play. Packers/Jets/Vikings QB Brett Favre's praise for WR Bernard Berrian makes it clear what kind of quick hitter pass play this is:
“In slants, you’re not going to be really wide open. You’ve got to be able to catch the ball in traffic and I think the Rams game the other day was a good example of him catching the ball in traffic, getting hit, holding on to the ball. That’s a tough thing to do, now: Go across the field when you know people are getting ready to pop you. I give any receiver credit for doing that. The good ones are the ones that can do that consistently. He just proved that in the last game.”
Getting good separation from defenders is hard for your receivers if they are jammed at the line, so you need to know how to recognize when the slant can safely be thrown even though there is a defender sitting on top of the wide receiver.
ProTip: To get consistent completions out of Quick Slants, follow the advice of Daniel Nations and set your pass catching strategy option to conservative. "Why conservative? If you catch more balls and have fewer knocked out as your receiver tries to bring it in, your offense will continue to move forward. An occassional broken tackle might be nice, but you'll kick yourself when your receiver drops the ball on a wide open slant route on 3rd and 6."
Your receivers will get hit almost immediately after they catch the ball on the inside Quick Slants routes when coverage is tight, but that doesn't matter; you'll still be picking up 8-12 yards. Look again up top at the shots showing the left WR making an inside release against UNC. The receiver has a defender right on top of him, but we know he can shield the ball from the defender with his body and owns the inside where the pass will be coming in low and fast. The WR gets tackled amost immediately, but the play still gets good yardage as long as he holds onto the ball.
The fourth rushing play in our standard offense, which completes the running portion of the offense, is the HB Counter Wk. When you hear people talk about the Redskins' Counter Trey under Joe Gibbs, this is close to the play they are talking about. Counter plays are misdirection runs, which in real football are used to fool defenses that are too aggressive. The run starts going to the strong side and then immediately switches direction to flow to the weak side. The FB acts as if he is leading the play to the strong side, which can fool defenders looking into the backfield into committing to that side of the field. Instead, the two strong side linemen pull and wander down the line looking to execute trap and kick out blocks on penetrating or weak side defenders. This opens a backside hole for the HB to take the ball through.
Here is Roger Mills of the St. Petersburg Times with a concise description of the action in the traditional Joe Gibbs Counter Trey from 2004:
Here is how it looks in the playbook: The offense lines up in a traditional set, with the tight end on the right (strong) side and a tight end/fullback on the weak side. On the snap, the ballcarrier charges left as he takes the handoff. In a flash, the left guard and left tackle pull to their right. The running back then switches direction and follows the two linemen.
In theory, both linemen are able to create a seam by overpowering smaller linebackers or safeties, so the running back can scamper for big yardage.
"It's the tight end sealing the backside so the defensive end can't run it down. Then you have a guard and tackle pulling on whoever the outside flat defender is and the first inside backer."
"You have those big linemen pulling, and when they pull, that's a lot of meat coming around the corner. . . So if you don't play it right, you get gassed. It's different seeing two linemen, instead of a fullback and a lineman. Your keys aren't the same."
"It's a misdirection, downhill play. . . You have a lot of different types of running games. The outside run, the inside run, the downhill power run and the misdirection run. But when you look at the counter trey, you're combining a little bit of power and a little bit of misdirection."
How the Play Works
The play acts like a gap blocking power run to the weak side. As stated above, your TE and the FB leading the fake to the strong side seal off the back side of the play. To the front play side, you have your C, weak side OG and OT down blocking and two pulling linemen to lead the charge. Their job is to kick out the strong side edge defender and lead block the inside linebacker in the hole. All the HB needs to do is read that lead block and scoot for some yards.
"I Left Split Right Max 36 Counter Trey" from mightymitesfootball.org
The key to running the play successfully is watching the pulling linemen to see where they end up lead blocking any inside or penetrating defenders on the weak side. Take the following HB Counter Wk left against Florida State:
There are two defenders lined up wide, outside the LT, with a FS to the outside and a LB directly over center. Notice the wide gap between the RDE and the RDT. The Seminoles are stacking heavily against the inside run to the strong side. This is a defense whose vulnerability is right where the Counter is going to attack it.
At the snap, we can see the RT and RG start to pull and move down the line. The LG moves up to take on the RDE charging to the inside, while the ROLB actually floats off into the flat zone. Because the ROLB does not push down into the backfield, the LT moves up to take on the RILB in the center of the field. Our pulling RT hits the LDT trying to penetrate, leaving the RG pulling around the weak side. He will kick out that ROLB once the LB realizes he needs to play the run.
Everyone is blocked on the weak side while the FS drops into a deep zone in centerfield, leaving a clear path into the secondary. This run goes for a solid nine yards.
Here is another HB Counter Wk left play call against Florida State. Again, the RT gets a nice block on the penetrating interior lineman while the RG pulls around the formation to lay a nice block on the LB to the outside. Take note of the LT who flows with the play and basically reverses field into a hefty crackback block (except that he's not a receiver from outside the tackle box).
What we have is very similar to the Power O run, which has a kick out block to the outside and gap down blocking inside to open a hole a little off-tackle:
Good execution of blocks and seeing where the lane opens up like in a Power O run is the big part of using the play effectively. Make no mistake, though, this is still mostly an inside run that will not stretch the defense too far:
The play stays between the hashes, but still turns it upfield for 11 yards.
Cutback Opportunity
The play is designed to aim diagonally toward the outside, but occasionally you will see major overpursuit from the defense as they try to take away the edge. In such cases, you will see lots of penetration on the weakside while a hole opens to the back side of the play. That is where you cut it back and exploit the hole the defense offers to you.
Here we have Notre Dame loading up the weak side, sending the DT crashing through to the weak side. You can see the FB pull up and spot the strong side LB patrolling the hole left by the DT.
Look at all the deep defenders running to the perimeter on the weak side, taking away the corner in the upper left of the picture. Meanwhile on the strong side, the FB takes on the LB, leaving a huge cutback lane to the strong side:
By the time the deep help arrives, our backup HB has picked up 11 yards and a first down.
This completes the four basic run play package. As Anthony McFarland said earlier, we now have one run of each type:
Iso - The Inside Run
RB Stretch - The Outside Run
Power O - Downhill Power
HB Counter Wk - Misdirection
On any down, this allows us to run at any part of the defense from this single formation.
The third play going inside to outside is the RB Stretch, which from its name is obviously an outside run designed to challenge the defense horizontally. This is essentially the same thing as the Colts' Stretch Play run out of the I formation instead of a single back formation. The stretch play is a valuable rushing play to have as a change up to keep the defense honest - it is a relatively risky play that has a higher chance of being blown up for a loss of yardage, but it can also break for lots of yards since it is designed to go to the outside. You do not want to rely on it as a primary running play, but call it maybe once or twice per long drive.
The play itself is a specific variation on a common running concept seen all over the place: the Outside Zone run. The blocking scheme used on the frontside tries to get zone block double teams in place to set up a cutback lane somewhere along the line of scrimmage. The HB takes the ball and flows to the play side looking for an opportunity to cut it upfield through a lane behind one of these blocks. As Colts President Bill Polian describes Joseph Addai in the Colts' scheme, the stretch run is a play that requires patience on the part of the runner:
He has to wait and be patient and wait for the hole to open up. At the professional level, especially with our offensive line, you don't just come off the ball and blast people back like you might do at the high school and college level. He's waiting for the hole to open up. . . most of the time when we're running a zone play, the hop that you see is absolutely part of the play because he has to give the puller a chance to come through or he's trying to read the double team or things of that nature.
How the Play Works
Rufio from Dawgs by Nature gives us the basic idea of what we are trying to do here - in his section on "One Cut Running," he shows how the zone blocking scheme looks for defenders who overrun the play and take themselves out of their lanes.
The offensive blockers, trying to keep everyone contained to the inside, see the guy run out of position to the outside and kick him further outside. That's what creates the hole to run through: overpursuers pushed outside and everybody else pushed inside - gap in between.
If more than one guy overpursues, they all get kicked out, and the back cuts back behind the last guy sealed off. The hole can open anywhere - it just depends on which defenders overpursue the play and get punished for mistakes.
The runner has to be able to watch for the hole and hit it when the blockers create it for him off the overpursuit. That's part of what Bill Polian is talking about when he says Addai is trying to read the double team. The read is important - Rich Rodriguez's spread option attack features an Outside Zone play:
After the handoff, the running back takes two steps past the quarterback, rolling downhill, aiming at the BUTT. A measure of capacity, equal to one hundred and eight gallons. See Measure. .....Click the link for more information. butt of the offensive tackle. The running back reads the first down defensive lineman to second down defensive lineman. The back has three options after his read of the down defensive linemen: bang, bend, or bounce.
That means the HB is reading the play from the inside out. He looks at the inside-most cutback lane and takes it if it's open: bang the OG hole. If that's closed, he proceeds to the next hole and takes it if it's open: bend it off-tackle. Finally, if everyone on the offensive line has succeeded in containing the defenders inside, he can bounce the play to the outside. Bang, bend, or bounce.
The Play Side Zone Blocks
If you get the matchups you want, you will see zone blocks develop on the side you are running to. Here we have RB Stretch right against Georgia Tech. The two front side zone combo blocks are boxed in yellow, and you see the desired inside blocks against the linebackers. The FB is going to lead block on the SS, who is up in run support.
As the play develops, the inside cutback lanes are taken away by line defenders coming off their blocks. The SS blitzes and gets deep behind the line of scrimmage. He turns and tries to come back inside to make the play, but the FB is waiting for him. Here is our overpursuing defender - we cut it upfield inside the FB blocking the SS.
The hole stays open long enough for the HB to sprint past and turn on the jets, looping around the WR's block all the way up in the secondary:
Note that you will not always see combo blocks develop on the front side of the play. If the defense has a lot of guys on that side, the blocking will change to one on one blocks right off the bat to make sure every defender is accounted for. In this RB Stretch left play, the defense appears to be trying to take away the outside run by stacking the edge:
Let's see what happens when the play is run. The defender at the end of the line of scrimmage runs out to cover the flat because the CB is blitzing from the outside. That puts two defenders deep but way to the outside of the play - they get kicked out by the TE and FB. To the inside, the LT gets good control over the LB standing up to his left. That's where the hole is: the last guy overran the play while the second guy stayed home and got blocked. There is a wide space between them for the back to bend through.
When the inside LB comes crashing down the middle of the formation, he takes himself out of the play because the outside zone run is flowing away from him too quickly. Without any deep help, this turns into a huge play:
Bang: Inside Cutback
Here is an example running RB Stretch left against Florida State showing the extreme inside cutback on the first read. The defensive alignment features a large gap in front of the LT-LG gap:
On the handoff, that inside hole is wide open, so the HB takes it.
This is the least frequent read you will get on this play, as the center of the defense is not usually this open. But when this is the right read, the HB must jump on it.
The second run going from inside to outside, is the Power play. This is an off-tackle run that brings a pulling guard as a sort of second lead blocker that wraps around and hits the inside linebacker on the play side. The play is designed to get you more hats to "overwhelm the defense with numbers at the point of attack." Paul Alexander from Central Michigan has a great two page summary on the play, which "incorporates double team blocking at the point of attack, a kick out block and a lead blocker to go after the off tackle seam." It is a very versatile play that can be run from a variety of formations.
How the Play Works:
This is pretty close to what we are running in the vanilla Power play in the Maryland playbook with no motion from the normal I.
The actual Maryland play is called "26/27 Power." The diagram for 26/27 Power against an Eagle 53 defense looks almost exactly like this diagram to the right.
From the Smart Football blog, we have a great summary of the action in the play:
A. The Offensive Line
The linemen to the side the run is going (playside) essentially “down” block, meaning they take the man to the inside of them. For the guards and center, that includes anyone “heads up” or covering them, but for the playside tackle, he does not want to block the defensive end or other “end man on the line of scrimmage.”
B. The Fullback
(T)he fullback (or, more often nowadays, some kind of H-back or other player) is responsible for blocking the otherwise unblocked end man on the line of scrimmage (“EMLOS”). He uses a “kick out” technique, simply meaning he blocks him from the inside to out, in order to create Lombardi’s famous “seal” going the other way.
C. The Pulling Guard
The final piece of the puzzle is the backside guard (sometimes nowadays a tackle). He pulls and “leads,” meaning he retreats, looks first for the fullback’s block to cut off of, and then heads into the crease looking to block the first defender that shows up — typically the playside linebacker. He can block him whatever direction is best; it’s the runningback’s job to find the open lane.
The aiming point for the HB is at the outside leg of the play side guard (here the RG). The pulling guard executing what the Maryland coaches call a "horn pull" block is the lead blocker on the play since the FB has essentially become the new end of the line sealing off the outside.
The "Two" Lead Blocks
Pat Narduzzi from Michigan State draws up defense against the Power
run by first explaining what the offense is trying to do. At the 0:53 mark of this explanation he gave on ESPN,
Narduzzi points this out: "Our fullback is going to be the lead back up
into the hole, okay, so they're going to have two possible guys come up
in that hole. So that's where you get the word 'Power' - is they want
to power up, they want to load up on the Sam backer." The offense is
using the pulling action to get extra blockers on one side of the field
to get a numbers advantage playside (in addition to the advantage of
already having a TE and FB going playside).
At the start of the
play, the back side guard fires out from his stance, breaking down the
line of scrimmage, and the FB aims at the furthest outside defender on
the line. Note the double team of the OG and OT on the front play side
and that the edge defender is the DB near the line of scrimmage (only
one safety is deep in centerfield - this is a 3-3-5 defense. Note the
guy on the end of the line on the right standing up).
At the handoff, we can see the LB is staying to the inside, and the LG has to move up to hit him where the hole was. The FB seals the edge man with a solid block, but is not able to kick him out. The HB can either cut upfield inside the pulling LG or continue flowing to the outside since the FB did not get a good kick out. Also, look at that nice combo block on the play side between the OG (#77) and the LT (#76).
In a real Power O run, the HB is supposed to hit the hole hard and resist the temptation to bounce the play outside. The runner should rely on his blockers to get the hole open, even if it isn't open when he gets the ball. The reason is because on a successful kick out block, a HB bouncing outside the block will end up behind the edge defender's back with the FB out of position to block - forcing the FB to take a holding penalty or allow the HB to get destroyed. In EA NCAA, the blocking animation is a lot more forgiving, and you can actually bounce it outside as is shown here.
Sometimes you can get weird blocking against strange fronts that don't match up well against the Power O's gap down blocking. Take this play against Alabama in a 3-4 with two defenders way outside to the weak side. We are going to end up with a nice five to four advantage in numbers at the point of attack:
The RT will end up leaving the WOLB unblocked and look to help inside on the LDE. Executing his down block, the C will take the LDE up and to the right of him. The RG will fire out and would normally try to pull around to block the RILB. The FB would be our kick out block on a normal play, but we have so much numbers on the play side that the TE follows the SOLB and handles the seal instead.
What's a FB to do? He is already in front of the play - in front of the pulling RG. So he takes the RG's assignment. Because of the overcommitment of the Alabama defense to taking away the weak side, we just have a lot of open space to run into.
Real Film: Michigan State vs. Wisconsin and Marshawn Lynch "Beast Mode"
Let's go back to Coach Narduzzi and let him take it on the monitor.
Conveniently, he uses Wisconsin film, with some early motion that
we're not interested in but that's okay. The option for the HB to
bounce the play to the outside is what he's talking about at the 0:55
mark: "squeezing that thing, making sure the thing's not open and by
staying square, if the back bounces outside, the D End will make the
play as well as secondary help." But the main point of the play is to
deliver what he shows at the 1:40 mark: "Right here, this double team
here, I probably failed to mention this. That guy right there is 300
pounds (circles the DT). That guy there (indicating the OG in front of
him) is 320.. (the OT in front of him) 320... so that's 600 pounds plus
against a 300 pound guy, so another critical spot obviously is that
double team."
And that's what we're talking about - we want to get an advantage at the point of attack. This is just like the Iso run
featuring angle man blocking to a predetermined hole that you're
looking to hit hard and read the lead blocker to see a cut. At the 2
minute mark, Narduzzi makes a point of sketching the hole and
emphasizing how he wants his guy in the center of the hole to make both
sides as even as possible. When you watch the lead block, you see the
FB drop the defender to the left, meaning the right side is what's open -
and that is in fact where the back has to go. The pulling OG does not
manage to get in front with enough of an angle to take out the defender,
so the Michigan State defense shuts the play down.
Matt Bowen from National Football Post uses the Marshawn Lynch Beast Mode Run as a prototype Power O rushing play:
- Power O, or “Bob O” (Back on Backer).
- Pull the backside guard, kick out with the FB.
- Down block by the TE, guard lead up through the hole.
- Downhill action from the RB.
Notice the Saints actually had it defended pretty well, and after the FB took the initial lead block there was a second guy flying into the hole. Lynch just breaks the tackles and turns it upfield, breaking tackles everywhere. The stiff arm on Tracy Porter is particularly nasty. But this really is Power O run by the Seahawks against New Orleans.
Here is I Left 27 Power against Utah State, who is stacking the line showing blitz:
Why is it called the ISO? Its simple, the FB is isolated on a Linebacker or SS with a one-on-one block, leading the RB, who then cuts to either side of the blocker. It is sometimes called a "blast" play, but I have always heard that referred to more as an outside Iso. Its not designed to break long runs, because you're basically going right into the meat of the defense between the tackles. Its goal is consistent 3-4 yard runs, and by the 4th quarter, those will start to be 7-10 yard chunks.
This is why the play is sometimes called BOB. In the play discussed by Andy Barall on The Fifth Down N.Y. Giants blog, "BOB stands for “back on backer,” and refers to the isolation block by the fullback on the weakside linebacker." Barall links to a great video analysis of "36 BOB" run by the Giants against the Lions by Mike Mayock at the 1:30 mark. Barall: "The fullback, Bear Pascoe, had the isolation block on the weakside linebacker, Ashlee Palmer. The play is designed to isolate the linebacker so the fullback can block him one-on-one."
It is such a basic play that teams will work in all kinds of small variations on it. The Giants ran that play with the WR in motion. Some teams run the Iso play with a TE in motion. What we will run is the standard no-motion Iso play from the I.
How the Play Works
What we have is a play designed to open a hole off the play side OG for the FB to lead the HB through. The offensive line (and TE) engage in man/gap blocks to occupy the defenders, leaving the one linebacker with no help in a one on one matchup against the FB. The blocking is intended to open a hole in the same place every time for the HB to hit and make a read off the lead block.
Here is Iso left against Miami lined up in a balanced 4-3 defense. The linebacker who we are isolating is outlined in red:
At the handoff, let's see how the play has unfolded. We have two combo blocks on the frontside, and our isolated LB is moving out into flat zone coverage. The FB sticks with him and nails him as he tries to come back into the play. Off the combo blocks, the LG peels off and takes on the MLB while the LT peels off the outside combo block to move up against the SS.
The play goes for a nice long gain - one broken tackle and it's off to the races:
Here is an Iso right play against Georgia Tech that we used earlier. The blocking has a combo block to the inside and as usual we have the FB isolated on the linebacker set back over the hole. The SOLB is lined up on the line in front of the TE, who will drive block him.
As the play develops, the nice inside hole opens up and our FB has a clear one on one block against the linebacker:
Back on Backer - the fullback executes his block just long enough for the ballcarrier to squeeze past. The HB makes the appropriate cut to the inside away from the SS help, and we break it for long yardage.
Bouncing the Play to the Outside
Sometimes, that nice hole will not open up for the FB to lead the play through. If the defense can clog the running lanes with enough defenders, there will be nowhere to cut and the play will stall behind a massed pileup at the line of scrimmage. If the defense takes away the inside holes, though, chances are containment on the perimeter will be weak.
Let's look at an Iso right play where the defense has good inside help and lots of defenders in the box. This is typical as you get nearer to the end zone since the defense does not need to keep to keep depth against long passes; so the safeties are closer up near the line. Georgia Tech here has lots on the back side of the play, which will flow to the run quickly once it is diagnosed:
The wide gap in the defense is directly over the RG, which will tend to push the play further to the inside since that is where the natural hole is likely to appear. In fact, this is exactly what happens, with most of the space at the center of the line, with several defenders on the back side unblocked and ready to attack the center of the formation:
You can see three free defenders on the back side and the play side is very cramped. If the FB goes through the hole and blocks the free LB, there is no room to cut around him. The HB is trapped if he stays inside, and will get caught by the defenders pursuing from behind.
Notice there is not much help on the outside. Since the defense has taken away the inside, we can glance at the outside and see if there is an opportunity for bouncing the play to the edge.
Sometimes it will be obvious that the defense is overcommitting to the inside. That's when you exploit them by going around:
Here's Navy's weak side heavy defensive alignment:
Look how there is just no deep help on the strong side:
One last example, showing another defensive set where the right end of the offensive line (the TE) is positioned to the outside of the last edge defender. This makes it much easier for the line to hold the corner for an outside run to get around. Here Clemson is in a goal line set trying to stop a 4th and 1 conversion:


 He has no help behind him to cover the HB spilling out into the right flat zone, so we make him pay.